pic303 ネットワーク監視 tcpdump
lpic303 ネットワーク監視 ntop
ではさっそくWiresharkをインストールしてみます。が、重要な事がひとつあり。GUIで確認できるツールという事で覚えていたのだけれど、どうもGUIのWiresharkはXの上で動くものらしい。XというかGnomeなのかな。
リポジトリはどれでインストールしても1.8.10-8でした。
Installing:
 wireshark                              x86_64                              1.8.10-8.el6_6                                sl-security                               11 M
Installing for dependencies:
 libsmi                                 x86_64                              0.4.8-4.el6                                   sl                                       2.4 M
たいした資料もないので、manで見ることにしました。
NAME
       wireshark-filter - Wireshark filter syntax and reference

SYNOPSIS
       wireshark [other options] [ -R "filter expression" ]

       tshark [other options] [ -R "filter expression" ]
GUIはWireshark、CUIはtsharkになるらしい。
とりあえず実行してみると。
# tshark -i eth1
Running as user "root" and group "root". This could be dangerous.
Capturing on eth1
  0.000000  192.168.0.1 -> 192.168.0.2  TCP 74 40757 > zabbix-agent [SYN] Seq=0 Win=14600 Len=0 MSS=1460 SACK_PERM=1 TSval=1685235378 TSecr=0 WS=128
  0.000279  192.168.0.1 -> 192.168.0.2  TCP 74 50553 > zabbix-agent [SYN] Seq=0 Win=14600 Len=0 MSS=1460 SACK_PERM=1 TSval=1685235378 TSecr=0 WS=128
  0.000768  192.168.0.2 -> 192.168.0.1  TCP 74 zabbix-agent > 40757 [SYN, ACK] Seq=0 Ack=1 Win=14480 Len=0 MSS=1460 SACK_PERM=1 TSval=1166626 TSecr=1685235378 WS=64
  0.000793  192.168.0.1 -> 192.168.0.2  TCP 66 40757 > zabbix-agent [ACK] Seq=1 Ack=1 Win=14720 Len=0 TSval=1685235378 TSecr=1166626
  0.000868  192.168.0.1 -> 192.168.0.2  TCP 95 40757 > zabbix-agent [PSH, ACK] Seq=1 Ack=1 Win=14720 Len=29 TSval=1685235379 TSecr=1166626
  0.000920  192.168.0.2 -> 192.168.0.1  TCP 74 zabbix-agent > 50553 [SYN, ACK] Seq=0 Ack=1 Win=14480 Len=0 MSS=1460 SACK_PERM=1 TSval=1166626 TSecr=1685235378 WS=64
Tcpdumpよりパッと見は分かりやすいかもしれない。
利用できるインターフェース。
# tshark -D
1. eth0
2. nflog (Linux netfilter log (NFLOG) interface)
3. nfqueue (Linux netfilter queue (NFQUEUE) interface)
4. eth1
5. usbmon1 (USB bus number 1)
6. any (Pseudo-device that captures on all interfaces)
7. lo
オプション。
SYNOPSIS
       tshark [ -2 ] [ -a <capture autostop condition> ] ...  [ -b <capture ring buffer option>] ...  [ -B <capture buffer size> ]
       [ -c <capture packet count> ] [ -C <configuration profile> ] [ -d <layer type>==<selector>,<decode-as protocol> ] [ -D ] [ -e <field> ]
       [ -E <field print option> ] [ -f <capture filter> ] [ -F <file format> ] [ -h ] [ -H <input hosts file> ] [ -i <capture interface>|- ] [ -I ]
       [ -K <keytab> ] [ -l ] [ -L ] [ -n ] [ -N <name resolving flags> ] [ -o <preference setting> ] ...  [ -O <protocols> ] [ -p ] [ -P ] [ -q ]
       [ -r <infile> ] [ -R <read (display) filter> ] [ -s <capture snaplen> ] [ -S <separator> ] [ -t ad|a|r|d|dd|e ] [ -T pdml|psml|ps|text|fields ]
       [ -v ] [ -V ] [ -w <outfile>|- ] [ -W <file format option>] [ -x ] [ -X <eXtension option>] [ -y <capture link type> ] [ -z <statistics> ]
       [ <capture filter> ]
オプションを見ながら色々触ってみるんだけれど、やればやるほどTcpdumpでいいんじゃないかと思えてくる・・・(´・ω・`)
サーバー機で今までXなんて数えるくらいしかインストールしてないので、使うのか?と思ってしまう。
今回は短いけどこれで終了~!
以下、10/29に追記しました。
と思ったんだけれど、Wiresharkが結構出題されたとPing-tに書いてあったので、Tcpdumpでいいじゃないかという気持ちを抑えてGUI環境から作ることに・・・。
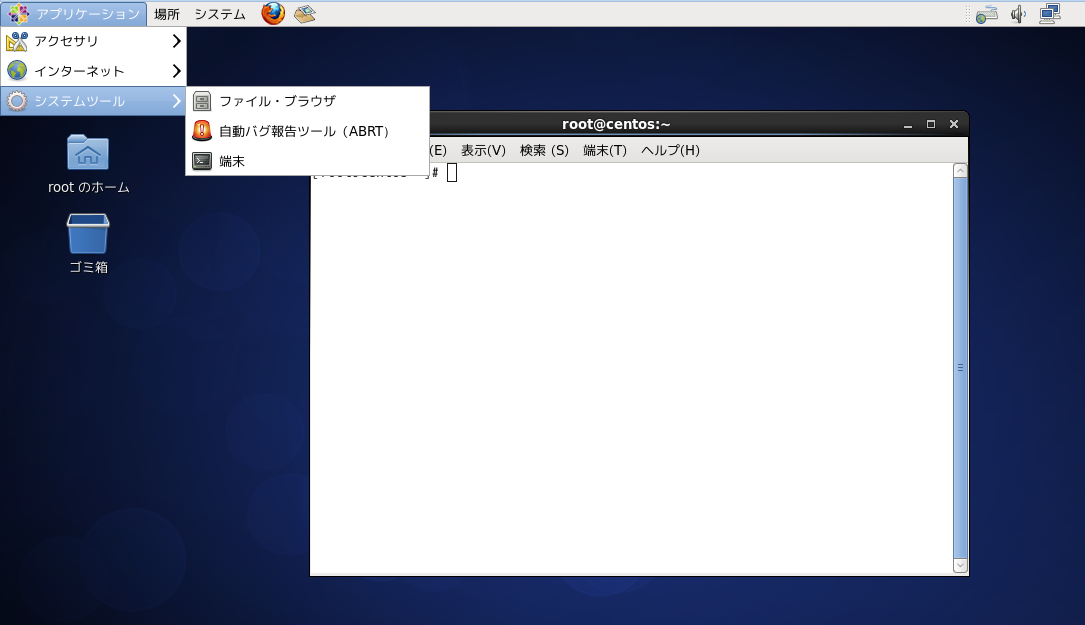
CentOS6.5のインストール中、minimal Desktopという選択肢があったので、迷わずそれを選ぶ。
Gnomeの画面を見るのはかなーり久し振りな気がします。minimal Desktopインストール直後はこんな感じで何もないです。そりゃそうなのですがすっきりしたGUIはいいねb
Wiresharkのインストールは
# yum install wireshark-gnome
で依存関係のものもインストールされて完了。アプリケーションから選択できるようになります。
さすがにパッと見で色々できるような(分かるような)作りになっていてそれらしいところをクリックすれば設定なりスキャンなりできるようです。
CentOSにはブリッジ接続でルーターからローカルIPを割り振るように設定をしている。プロミスキャスモードなので、eth0をキャプチャすると今使っているWindowsのパケットも流れていきます。
たしかにパッと見では使いやすいという面はありますが、便利かというと微妙なとこで、適材適所に使うのがいいかな。
今度こそ終わりー。

